Hey arbesfeld, I really like that project, and the nice writeup really presents it well. But especially as people might use it for inspiration for their own temperature-controlled cooking projects, I think the lack of a proper isolation of the mains-powered parts is a little bit worrying.
For the next project, or maybe as advice to the random person looking at the HN comments, here's what I normally do:
Try to minimize the area of unisolated conductors in devices on which you work. If I solder cables to e.g. a mains inlet, I'd put heat-shrink-tubing over it, so that it's not touchable anymore. Or use the proper crimped terminations, which also are available in isolated versions.
To protect braided wire, and make the connections more reliable over time, I like to use "wire termination" (I don't know the correct english term, in Germany we call them Aderendhülse (literally: conductor end sheath).
Instead of these "screw on caps" for cables, try to find suitable terminal blocks.
If you have the possibility to access a 3D printer, make a small clip that goes over the screw-terminals of the solid-state relay.
If possible, try to have a "high-voltage" and a "low voltage" side in your enclosure, that way, you are even less likely to come in contact with mains voltage while working e.g. on the MCU part (connecting/disconnecting the programming cable).
I'd like to stress again: I really like your project as presented, I only want to show some ways in which the project could serve maybe as a inspiration also to safe mains-powered electronic design.
Thanks for the tips. This was my first time working with power components and I wasn't familiar with most of these parts. I'll incorporate these suggestions into the blog post so that they can be a resource to others.
Recommending using a Wago [1] or Set-Screw wire nuts [2] for joining wires as these are harder to use improperly than a wire nut. Video on how to use a wire nut [3]; people mess these up all the time. For the mains voltage I recommend using at least solid THHN 14 AWG wire, it's the minimum required wire size for a 15 amp circuit (Most outlets are rated for 15 or 20 amps); color coded as well, white for neutral & black/red for your hot, green for ground. If you're unsure what one is hot, compare the voltage to the ground. A good clean design should not require electrical tape for it to be safe if you take the cover off.
Having a physical barrier between your low and high voltage areas is a must; the low voltage wire used to switch the relay is the only thing that should go inside the high voltage area (drill a small hole just for this wire & keep it away from 120v as much as possible), also mount the plug for your 5 volt source on this internal wall; or better yet use a USB outlet [4] as these are designed to be ran inside an enclosure. Using color coded wire for the low voltage is advised as well.
Since you're dealing with water, making this device GFCI protected would be smart. Have your mains run through this first before anything else [5]. And finally for the relay get one that is UL listed & opto-isolated in order to prevent bad things from potentially happening; the RIBTE01B [6] will most likely fit the bill. Be sure to check the ratings for your relays; putting more power through them than they are designed for might end up with your project in flames. If you're unsure about the power requirements, using a small relay to turn on a big relay [7] is OK.
Edit: If you do end up keeping your solid state relay, ground the heat sink.
2nd Edit: If you want to avoid the need to 3D print the enclosure, using a 4 gang box [8] you could make this work. 1st slot is your input Single-Gang Decor Recessed Power Inlet [9]. 2nd slot is the GFCI [5]. 3rd slot is the USB outlet [4] with a cover [10] for your low voltage side. 4th is the outlet [11] to your heaters. Drill a hole in the box for the relay [6] if it doesn't fit inside as it is threaded and is designed to be externally mounted like this if needed. Mounting some lights [12] is helpful to know if the device has power and the outlets are powered. If you can find a larger gang device [13], you can incorporate an simple switch to turn the whole thing on or off and maybe mount everything inside.
I don't mean to pile-on, since I like the project too. But whenever I read about a process control project, I always have to chime in with my usual question, about fault tolerance: Can the system withstand the condition where the heaters remain fully powered, indefinitely? This could happen if:
1. The relay fails shut (which may be its typical failure mode)
2. The temperature sensor comes out of the water, or fails in some other way.
3. Software bug.
I could tell you my story of my temperature controller running away in the middle of the night and wreaking havoc on a delicate and elaborate physics experiment. But in terms of taking your project "to the next level," it's worth thinking about how you can design your system to fail safe, i.e., so it remains safe under any reasonable single fault failure mode. A more subtle failure mode might be failing to reach the set temperature, resulting in undercooked meats.
Hi! Original poster here. I built this as part of the "How to Make Almost Anything" class at MIT (http://fab.cba.mit.edu/classes/863.14/). This was more of a weekend hack for fun than a money-saving project. Thanks for all of the advice and comments!
Do you know if they've released the android app yet? You can use it without (has a little wheel to set temp), but the monitoring and timing obviously don't work.
There is an android app on the google play marketplace, but it is not from the anova folks and it costs $2. I haven't purchased it, because I already have my own list of "if you're cooking foo, set the temperature to bar" commands in my (analog) recipe notebook.
Everything else about the newer anova is great. I have both a new-style and old-style (anova one) from them, and they're both cool. Now that I have the newer one with the adjustable clip, I intend to keep that in my kitchen for simple sous-vide stuff (steaks, chops, eggs, etc) and build an insulated enclosure out of a cooler for the One, so I can tackle bigger cooking projects.
The app isn't out yet but the Bluetooth API is fairly simple: https://github.com/neilpa/circulate and I ended up hacking together a very basic app in node.js in about 3 hours.
I own a Sansaire too and have heard a lot of good things about the Anova... have you had experience with both? Would you recommend the Anova as an upgrade from the Sansaire?
I'm curious to see a graph of actual temperature vs setpoint. You're doing basic bang-bang control with a bunch of immersion heaters that get hot VERY quickly.
And, dude, make that thing a little safer. Fuse your AC supply. Use real crimped terminal connectors. Put a safety enclosure around those immersion heaters or at least get them farther away from the wall of your chamber. Find a better way to secure them than electrical tape.
And for $100 you can get a Dorkfood DSV from Amazon that will (safely) PID-control a $10 crockpot. So there are cheaper alternatives than what you have found.
Great writeup, but we're probably past the point of DIY sous-vide systems being anything more than weekend hacker project for funsies.
I just picked up an anova a few months ago (was $169 on sale) and for that price you need to be getting a lot of enjoyment out of the build process and be happy having an inferior product at the end. http://smile.amazon.com/Anova-Sous-Vide-Immersion-Circulator...
It is way, way exaggerated. Even the professional Polyscience (the one I see in restaurant kitchens) only costs ~$800. HN'ers shouldn't pay anything like that: the current price point for consumer home circulators (the only kind you should get, like the Anova or Nomiku or Sansaire) is ~$160.
I was on the design team for the PS machines. (I say design team, I mean it was three people in a room for the whole thing [circuits/software/mechanical design].)
The main advantages of a high end machine are more accurate control (small advantage) and circulation (big advantage). The linked article's control algorithm is primitive (to say the least), and probably only marginally maintains set temp. The PS machines are accurate to < 0.01 degree (which for food doesn't matter), but the control software is the same between the food machines, and high end chemistry equipment.
As far as I can tell, some small waterproof fans would be more than enough for sufficient circulation. Why is that a specific advantage of high-end ones?
flow is very important with the temperature gradients that can exist in fluid. When you're talking about 0.01 and 0.001 degrees, flow is really important.
"Average" is probably not the right word, but maybe the author is referring to full-on water baths, not immersion circulators? the Sous Vide Supreme Demi is between $300 and $350. A Fusionchef water bath is up to $2000.
I have the SVS and an Anova and I use the SVS much more often. In my experience it holds to temperature better and more uniformly, the heating element spans the entire base so it's easier to cook in bulk (without worrying too much about blocking convection), I didn't have to hack a lid together, and it looks a lot better on my kitchen counter--which is important because it never leaves the counter, I use it five to six times a week.
I'll use the Anova (which I got for free, I wouldn't have bought it otherwise) if I need a very large bulk batch of something that I'm not worried about keeping at a precise temperature, but the SVS fits me a lot better otherwise.
the SVS is accurate across the horizontal plane, but not across the vertical plane. I couldn't trust a water bath without active circulation ( I use a Sainsare at home, and at work, we use PolyScience circulators)
I guess maybe it's neater and more self-contained? But the reason isn't clear to me today. They may have been reasonable alternatives to $800 Polyscience units a few years back but I don't see why the typical consumer would buy one rather than a $150-$200 immersion circulator.
R4 and R5 are 0K resistors. 0K resistors actually exist, and are typically used in place of short pieces of wire. The advantage of a 0K resistor over a short piece of wire is that they can be picked and placed and soldered using the same equipment that handles resistors, thus saving the need of having a separate machine for short wires.
That is how they are being used here, as you can see from the layout diagram. R5 is used to carry the RST signal over another line on the board, and R4 serves the same function for VCC.
First question: should these even be included on the schematic? They only exist to work around a construction limitation due to the use of a single layer PCB. If the circuit was built on a two layer PCB, or a breadboard, or wire wrapped, there would be no 0K resistors needed. I thought that schematics were supposed to just convey the topology of the circuit, leaving things related to the practical difficulties of construction to other documents (like the layout diagram).
Second question: on the schematic, why is R5 shown as connecting RST to RST, but R4 is shown as connecting VCC to itself? They are both being used to take a line across another line, so why aren't the both drawn the same way on the schematic?
A 0 ohm resistor typically is only used for places where a different-valued resistor could be substituted or used to exist, or to act as an optional jumper on different revisions of hardware. In those cases, the resistor is in the schematics.
A circuit designed from the start with a 0 ohm resistor that was just used for connecting two points across some board feature would never make it past review where I used to work. Such a situation may come up due to later design changes or board damage, in which case the board is modified by use of a "blue wire", which is an actual blue-insulated wire that makes a point-to-point connection on the surface of the board. Those are not in the schematic.
That said, I used to work on military electronics. Perhaps the consumer electronics world is different.
Great questions. As you point out, I'm using the 0K resistors as jumper wires. It's a one-sided board so the 0K resistors basically act as a second layer on the board.
Regarding your first question, I am not sure how to place a component only on the layout diagram. This would be ideal, because the 0K resistors really shouldn't be encoded in the schematic.
I agree with your second point -- it's just an inconsistency in my schematic!
It may not be about sealing in the juices, but a sous-vide steak out of the bag is a very unappealing grey color. And the Maillard reaction is necessary for proper taste. You need to do something to it, be it throw it on a hot pan for a minute a side or use a Searzall.
The searzall has become an absolute necessity in combination with my sous vide in the kitchen. I definitely do a post-sear, although I never really do a pre-sear. I can see reasons people might want to, I should experiment now that it's easier to do that.
I'm dubious about searing it twice; it's something I've never seen mentioned in the reading I've done on slow, temperature-controled cooking. It seems like it would just dry out the edges, making them leathery; however, I'm willing to be educated otherwise in the effort to make a great steak.
The pre-sear (which can be lighter than the post-sear) adds flavor, but also makes the (important) post-sear much faster, which also minimizes the degree to which the post-sear will raise the interior temperature of your protein.
The pre-sear is especially important with long cooks, because it kills surface bacteria. The first time you get too much lactobacillus hitching a ride on your short ribs will be the last time you skip out on the pre-sear. (Lacto isn't dangerous; after all, the protein is pasteurized in the bath, but the final product will smell awful).
I'm not sure what you mean by "drying out the edges, making them leathery". I think I can just say "no" on that.
The lacto explosion is way more likely to happen when your meat is grossly under-seasoned going into the bag. Which is probably the most made mistake by home cooks.
I cooked in New York City during the years that sous-vide became legal. I worked at the restaurant that received the first sous-vide permit from the health department, and later at other Michelin starred restaurants that did sous-vide. That of course doesn't give me authority, but I do have a perspective on what the best professionals do.
For meat, salt aggressively going into the bag, and lightly coming out of the bag. Sear once :-)
(As an aside, since I'm already talking to you. You're one of my favorite commenters here on HN, and one of the reasons I don't skip the comments section entirely.)
The flavor of my steaks shot up once I learned to put more salt on. In general, once I learned the reality of salt (eg there is no reason to limit consumption), my cooking got much better.
> In general, once I learned the reality of salt (eg there is no reason to limit consumption)…
This caught my attention because I may have mild hypertension and am starting to be more conscious of my diet. Would you happen to have a source that I could start from?
This[1] is a good place for high level, but it won't help you individually. Sodium only has the ability to impact blood pressure by 2-3mmHg diastolic and 5mmHg systolic, so limiting its of very little value for most[2].
My own personal experience reducing my creeping blood pressure came not from curing salt but from curing carbs. When carbs are reduced, the kidneys begin functioning better, reducing fluid in the blood which reduces blood pressure far more successfully than curing salt. This is just one of the many positive metabolic effects of low carb, high fat diets that are very well documented in scientific literature (others include normalized blood sugars, reduced inflammation, reduced liver and visceral fat, improved blood lipids, weight regulation and improved insulin sensitivity).
That's a great start. I've been reducing my carb intake as well, but I probably need to throw a bit of cardiovascular exercise into the mix before I can see results.
My understanding was that the latest research showed that some folks are quite sensitive to salt, and that a low sodium diet is critical to their health. But that most folks are not, and there isn't a benefit to a low sodium diet for them.
I couldn't jog the citations back into my memory, but I may have another try after a bit.
Question for sous-vide aficianados. Are you not worried about the chemicals going from plastic to your feed ?
I grew up knowing that, by and large, the less manufactured stuff you put in your food the better the food is for your body.
So, it seems highly dangerous to me to take natural piece of food, wrap it in a highly complex chemical compound (plastic), heat it, and then consume it.
Most of the time the food came in that very plastic. I mostly sous-vide meat that came frozen and is already vacuum sealed. One less step.
You're generally heating it to 140 F or so. I don't know if that's sufficient to trigger leaching of some sort, but the plastic isn't deformed in any way and there's no aftertaste.
Is there any scientific evidence for this statement on no harmful chemical transfer below 140F. Also, just because the food came in the very bag you're cooking it in doesn't mean it is safer.
> Is there any scientific evidence for this statement on no harmful chemical transfer below 140F.
I didn't make that statement. I simply stated that was my practice. If you have evidence that it is harmful, I would certainly like to know.
> Also, just because the food came in the very bag you're cooking it in doesn't mean it is safer.
Absolutely. There is no evidence that it doesn't leach at room temperature. Should we stop buying all food packaged in plastics? That's a tall order. Many vegetables come in plastics now and those that don't, you'll likely put in a plastic bag either in the grocery store or as you're leaving it.
Do you have evidence that any of this is harmful? Genuinely want to know.
I don't know much about sous-vide, but the cooking temperature is 55 to 60 degrees celsius. That's fairly low. Most plastics shouldn't deteriorate at that temperature.
I am not worried about natural toxins. Most of what I select to eat is likely free of them. What I am worried about is that there doesn't seem to be any evidence of non-transfer of chemicals even at lower temperatures. I see claims but no clear evidence. Even if the transfer rates are low the chemicals "dose" can accumulate over repeated use.
You have to realize even if your "natural" food is free of toxins, the traditional cooking methods are likely to produce them, especially in grilling, frying and baking. And the worse part is the chemistry there is complex and may differ depend on source material and actual cooking method. On the other hand, the plastics are simpler and easier to analysis of possible transfers(or changes) in given temperatures. For the types approved for microwave uses there are more research done than say the interaction between beef and your pan. So I wouldn't worry too much about it.
"Sealing in the juices" is definitely false, but a hot sear to cause the Maillaird protein reaction is important if you want to have the distinctive "traditional" steak taste.
Definitely after. Cooking denatures the myosin and releases water; a seared steak soaking in water isn't going to have the kind of texture you'll get (and want!) from the Maillard reaction.
I guess what I mean is that it'll taste fine but the texture won't be quite there.
That's good for a 1-hour steak, but I wouldn't do eggs this way (needs more precise temp) or a 72-hour short rib braise (needs stable heat for longer).
I agree--and even for one hour timeframes, be sure to check your ending temperature to make sure it didn't cool off too much. I'm not a fan of the beer-cooler method for this reason (although with care, of course, it's safe).
Or, instead of writing temperature control logic yourself, you can buy a really cheap PID. There are nuances to good temperature control that warrant using chips that optimize for the environment they are heating.
I'm sure that in water, a simple thermostat can be good enough, but its probably still best to have a controller that optimizes for its environment. A major point of sous vide is that the cooking temperature is very close to the minimum pasteurization temperatures. Cooking steak at 137 degrees requires that you are SURE it actually cooked at 137 for the amount of time you specified. Also, 90 minutes for a steak is insufficient at 56°c
Great points, I do think that a professional PID is a better and more efficient way to build a sous-vide. I wanted to build something from basic components instead as part of the learning process, and also to allow me customize the logic via Bluetooth.
Regarding the steak, I find that a 1 inch thick steak only takes ~45 minutes to reach the target internal temperature. This scales dramatically as the steak thickness is increased, however.
because the temperatures inside are below instant pasteurization temperatures (158°F) though, reaching the target is insufficient. They need to be held at the target temperature over a period of time to guarantee sufficient pasteurization.
I'll also agree that the learning process can't be beat the way you did it.
Be careful with Arduino libraries. If you are trying to learn something, it's usually better to write your own, or look at really good code.
Case in point, PIDLibrary, I'm looking at the PIDCompute function, line 57:
ITerm+= (ki * error);
That's not how you deal with I. You are supposed to accumulate (integrate) the error and multiply by Ki only for the final PID addition. You don't want to accumulate your errors multiplied each time by Ki, it makes no sense.
That is actually done intentionally to allow for changing of the tuning parameters while the PID is running.[1] The author of the PID library has a full writeup on the design of the algorithm.[2]
There is a tutorial on Adafruit[1] that makes use of that library to build a sous-vide cooker using a rice cooker or crockpot. I built one a little over a year ago. It was a great learning exercise. The real issue with it is that (at least with my setup) it takes forever to preheat (~1 hour to get to 130°F). I speed this up using boiling water. At higher temperatures (170°F+) it still takes a long time to heat, even with this method. I also use a pump to improve the temperature consistency, which is not mentioned in the tutorial. I recently got an Anova Immersion Circulator, which is much easier to use.
Steak is generally safe to consume at any temperature as long as the exterior surface (where any nasties would live) is seared, which takes it well above 158*.
Yeah - I've had plenty of steak tartar, and it is delicious. The difference here is that with steak tartar, you know you are eating raw meat. With Sous Vide, you assume you'll be eating safe meat. It is doubly important in sous vide to reach pasteurization because of the extended period of time spent in the bacterially friendly temperatures.
Its a good point about the exterior surface, but the blog post also shows him cooking a hamburger.
I love the "cost" table. Having recently built a mobile phone out of a rotary phone (https://www.youtube.com/watch?v=fSkdWQswpc8), my costs look something like those, except:
Cost of materials: $50
Time cost: $1500
Then again, it is a prototype, which has to go with all the fixed costs, but to say that this cooker only cost $X isn't entirely accurate.
I think you are correct, the commercial models are marketed as circulators so they have both the heating element and a way to move water around to ensure even temperatures throughout the water tub.
I'd be curious to know how much the temperature fluctuates and what the average temperature is, plotted against the target. A simple on/of setup like this is much less complicated than a PID setup, but in my experience, the PID code would allow for a much more accurate temperature to be maintained.
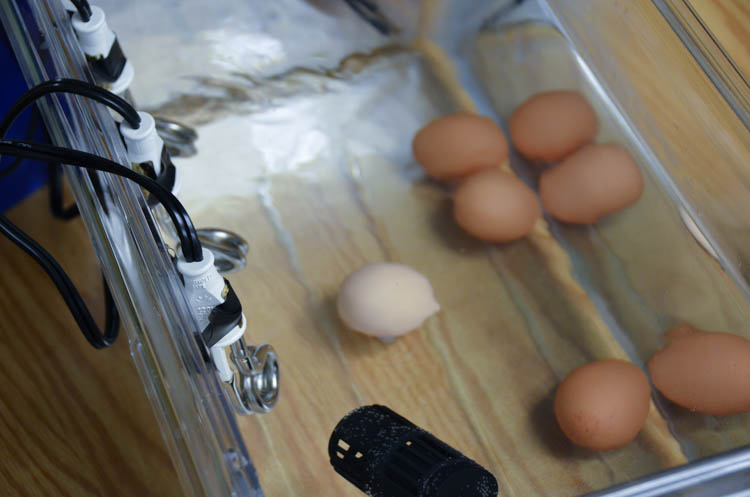
In larger baths of water (I am using a half-filled 4.75 gallon container), the temperature only fluctuates ~0.25C from the setpoint, as measured by the sensor. I think the large quantity of water makes the change in temperature very gradual.
I've done some sous-vide after watching Chef Steps[1] on youtube. I just used a water thermometer and ziplock bags, which they have some examples of in their videos.
My smallest stove top burner at its lowest setting gets water up to 117F. The salmon video they had the temp at 109, but I tried it anyway. It turned out amazing - I'd definitely do it again. I also tried steak, but bought a cheap cut, and it turned out really good as well. I turned the burner up to 2.5 which got the water temp to around 135F.
I'm so happy with my results I'm looking at purchasing a real sous-vide heater. Sous-vide definitely has a bright future.
I have a Sous Vide Supreme[1] and it's pretty much the secret weapon for making cheap beef tasty. Even cheapo chuck can do really well in one of them if you let them go for a while. What's nerdy-cool about it, I think, is that if you're quick, you can seal a steak with no air bubbles whatsoever and the steak will remain bright red while it cooks. Obviously you sear it after, but watching people's eyes bug out a little when they see the bright red slab of perfectly tasty and cooked meat come out of the pot is kind of amazing.
[1] - I also have an Anova, and if you can swing it I much prefer the SVS; with the Anova the temperature gradient can be pretty wide in larger containers, and you don't have to be nearly as careful about how you place stuff in the SVS.
Really? You're getting better performance from an SVS than an Anova? My understanding is that for reasonable water baths, the Anova is pretty close to the performance of the Polyscience, which is the gold standard. When Kenji Alt tested the Anova, he found his unit had been miscalibrated; maybe check yours?
I donated my unopened Sansaire to Butcher & Larder and the first thing they did with it was set it up in a huge water bath to cook a bunch of huge mortadella. It took them forever to get the bath up to temp, so long that I thought something might have been wrong with the unit.
I think the fix was to cover the bath to eliminate evaporative cooling. That is also a problem the SVS doesn't have, being a closed bath. But the circulator should be more flexible and, from what I understand, higher performance.
If you're willing to spring for the SVS, a better rec might be to go for the mid-range Polyscience (the CS).
For my use cases, I find the SVS Demi (sorry, forgot to note that before) to work well. I use it primarily for cooking for one or two people, on a daily basis, so it does have a home on the counter and all. Setup/teardown (or just having an ugly stockpot on the counter) makes the Anova worse for my use cases, so I only break it out for big, 5-6 gallon batches of stuff, at which point there is something of a temperature gradient at the far end of the bath. I don't think it's a calibration thing, because it does work fine on smaller batches, it's just not very useful to me there.
Also, I bought the SVS Demi on sale for under $300. The Polyscience bath is like $500. (I got the Anova for free.)
Or long, slow cooking in general. The "secret weapon" property of low-temp cooking is not so much that it makes cheap cuts taste better, but that it makes them taste like expensive cuts of beef --- not the same thing.
The best-tasting cuts on a cow actually tend to be the cheapest anyways.
For the readers, this is not a "sous-vide" cooker, only a temperature controlled immersion cooker. "Sous-vide" means "in vacuum" and usually you combine low temperature controlled long time cooking with low pressure.
The point of this mode of cooking is that it's low temp, below the temperatures at which plastics in high-quality freezer bags become an issue (Ziploc confirmed this to Dave Arnold earlier this year).
Make sure you're using Ziploc specifically -- as in that brand. Other manufacturers may have their own formulations for their plastics, including non-heat-stable plasticizers. I contacted Trader Joes, for example, when writing Cooking for Geeks, and they disclosed that their plastics are NOT heat safe.
I fully expect plastics labelled with e.g "up to 90 degrees C" to not release anything unwanted into my food if I stay well below that temp. I'd also expect the label to have a wide margin to dangerous temperatures.
In theory you can use anything that handles the temperature, such as silicone. You could in theory force your food into a jar with a bit of oil.
You might be making matters worse with a jar: those with screw-on lids have a plastic lining in the lid that's traditionally PVC with plasticizers which are considered to be bad for health. To make matters worse, oil will support the migration of the plasticizers out of the plastic.
Yes: you can use glass jars with liquid (oil, marinade, etc.) inside them. Make sure the jar isn't too large; there's potential safety issues with ramp-up temperature of the center of the jar vs the outside.
I find it generally easier to cut items into portion sizes before cooking them sous vide.
- It makes the size more manageable in your water bath.
- You don't have to worry as much about temperature ramp-up time between outer surface and core of food item.
- For delicate proteins, means there's less handling of the item post-cooking.
I completely agree, I'm just stating the alternative. Sometimes standard freezer ziploc bags aren't even big enough. I was doing a large prime rib a while ago and has to use the larger size freezer bags that aren't normally available at my grocery store. If you used something else you would need a large amount of butter/liquid to get rid of the air.
Additives to plastics break down at lower temperatures. EVA breaks down at around 149f (you meant f, right, because nothing is cooked sous vide over boiling temperature).
Pedantic: you built a really cool PID-controlled immersion heater, not a "sous vide cooker". Sous vide is the technique of preparing food in a vacuum. Placing food in a zip-top bag and displacing the air out might give you a reasonable water-product interaction surface, but it does not form a vacuum, and therefore is not cooking en sous vide.
I'm curious on some numbers on how this performs compared to the commercial units the expensive food industry models and the new kick starter wave.
Something like this could be really neat since it is versatile and you could use it to heat/cool other things. Thinking about food the first time to mind would be temperature control for charcuterie and cheeses.
People already do stuff like this with PID-controlled temp and humidity, both for curing meat and for barbecue. Auber Instruments makes controllers designed for it, and they're pretty cheap.
Exactly. This is really a general purpose temperature-controlling device (as opposed to the hyper-specific commercial hardware). I'm hoping to incorporate the same design into a smoker and refrigeration unit.
I was wondering why there is a need to involve a micro-controller? I can see this project being done with couple of op-amps and potentiometer? I see so many hobby project using arduinos for no good reason. Please people show some love for analog electronics!
You're not really mistaken. You can do some interesting things with eggs--very precisely control the texture of both the white and the yolk (which relates to the coagulation of different proteins). But, for the most part, I use sous vide for meat and, especially, red meat. I'm not sure I'd say you need to eat a "lot" of meat (it's not like I use my sous vide setup every few days) but it is primarily for meat.
I must say that I've never tried it with chicken thighs. I do use it with boneless breasts now and then for when I want some cooked chicken for a salad or noodle dish. It really helps keep the meat nice and moist while being cooked just right.
Like traditional BBQ (e.g., low-and-slow cooking over coals) sous vide is most interesting when applied to meat, especially cheaper cuts that would normally have to get boiled, braised, or roasted to within an inch of inedibility before being soft enough to eat.
That being said, my absolute favorite thing to prepare sous vide is carrots. Lots of other root vegetables (turnips, burdock, sunchokes, new potatoes) can similarly be cooked in a water bath to a temperature just high enough to soften them without extracting flavor or nutrients via boiling, steaming, or sautéing. I've also had good luck with green beans, asparagus, and broccoli rabe.
Finally, if you're pescetarian seafood is also a great option. I'm not sure I'll ever cook lobster any other way after seeing what whole (shell-on) lobster tails are like cooked sous vide with a healthy dollop of butter.
The low-pressure vacuum sealer doesn't do anything for vegetables, but chamber vacuums burst the internal air cells in plants and can significantly change textures to an amazing degree. (This is separate from the actual cooking process, which itself can change things, but not to the degree that occurs for meats.)
I've never understood the need for a complicated sous-vide setup. I've found that water at 80 degrees Celsius in a heavy pot with the lid on will remain sufficiently hot for 30-45 minutes. If not, you can always swap the water halfway through.
That works fine for short cooks and for the most forgiving proteins, but it does not work well for long cooks, braise cuts, vegetables, or high-temp proteins (like confit). It's also much less convenient; you can bag proteins and dunk them in the circulator in the morning and sear them when you get home from work.
For your use case, maybe, but "halfway through" for much of what I use my Sous Vide Supreme for would be three or four hours. And I rarely have mine at 80C - I do beef at 55-57C, and there are safety implications (or quality implications, in the other direction) to not maintaining temperature.
I have one created using an Arduino and a Crockpot. The biggest thing for me is that I can throw some steaks in at 730am when I leave for work and when I get home at 530pm they are ready to eat (or sear-then-eat, I guess).
I think it's the same argument as why you would want a crockpot in your kitchen, versus a normal pot.
Great project, and great write-up. But most people don't have access to a 3D printer... which significantly changes the effective "cost" for such folks. Still, thanks for sharing! Hope you enjoy all of that perfectly-cooked food :)
Looks great. I guess this would be a great time to think of maybe trying your luck with Kickstarter (that is if you are interested in continuing working with such hardware). Either way a nice write up for a cool little project !
His BOM is just ~$60 off Sansaire's retail price, which is an integrated circulator with performance near Polyscience's. This is a bad idea for a Kickstarter: there is already an open price war between commercial-quality circulators. They'll be under $100 within the next couple years (it's just not that expensive to produce them.)
The point of sous-vide is [primarily] to break down proteins in meat? Presumably then you can freeze the meat or refrigerate and simply re-heat/sear at a later time?
Under this assumption are any stores offering pre-sous-vide meats?
For the next project, or maybe as advice to the random person looking at the HN comments, here's what I normally do:
Try to minimize the area of unisolated conductors in devices on which you work. If I solder cables to e.g. a mains inlet, I'd put heat-shrink-tubing over it, so that it's not touchable anymore. Or use the proper crimped terminations, which also are available in isolated versions.
https://www.google.de/search?q=flachstecker&tbm=isch
To protect braided wire, and make the connections more reliable over time, I like to use "wire termination" (I don't know the correct english term, in Germany we call them Aderendhülse (literally: conductor end sheath).
https://www.google.de/search?q=aderendhülse&tbm=isch
Instead of these "screw on caps" for cables, try to find suitable terminal blocks.
If you have the possibility to access a 3D printer, make a small clip that goes over the screw-terminals of the solid-state relay.
If possible, try to have a "high-voltage" and a "low voltage" side in your enclosure, that way, you are even less likely to come in contact with mains voltage while working e.g. on the MCU part (connecting/disconnecting the programming cable).
I'd like to stress again: I really like your project as presented, I only want to show some ways in which the project could serve maybe as a inspiration also to safe mains-powered electronic design.